


Electric Underfloor Heating Troubleshooting: Common Faults, Tests and Solutions
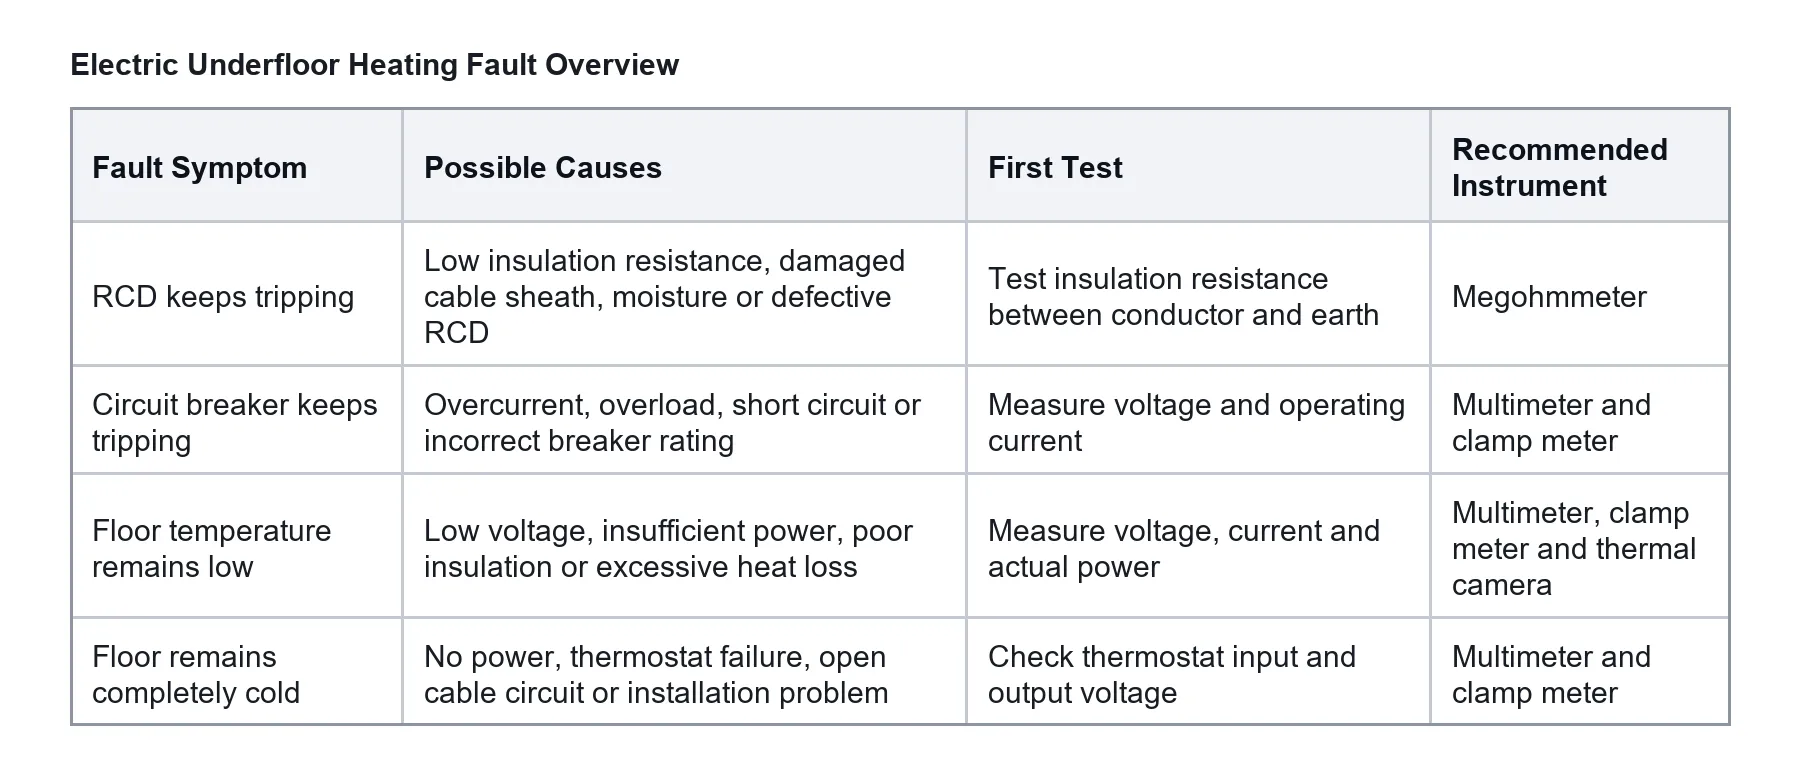
Electric underfloor heating is generally reliable when the heating cable or heating mat is correctly selected, installed and controlled. However, when a fault occurs, the visible symptom does not always reveal the real cause. A tripped residual current device may be caused by damaged cable insulation. A floor that heats slowly may be related to low voltage, insufficient heating power or poor insulation. A completely cold floor may result from the thermostat, power supply, heating cable or floor construction.
For installers, distributors and project contractors, the most effective method is to test the system step by step instead of replacing components at random. MENRED supplies complete electric floor heating solutions, including electric underfloor heating mats, thermostats and floor sensors for bathroom, renovation and tile floor heating projects.
Product reference: MENRED Electric Underfloor Heating Mat.
What This Guide Covers
- The RCD, RCCB or RCBO keeps tripping.
- The circuit breaker keeps tripping.
- The floor heats, but the temperature does not rise enough.
- The floor remains completely cold.
- Which instruments should be used for voltage, current, resistance, insulation resistance and thermal checks.
Safety Before Troubleshooting
Electric underfloor heating normally operates from a mains power supply. Electrical testing, insulation resistance testing and cable repair should be carried out only by a qualified electrician or trained installer. Always follow local electrical installation regulations and the product manual.
- Disconnect the power before measuring heating cable resistance.
- Use a meter suitable for the required voltage and test category.
- Do not use a standard multimeter for insulation resistance testing.
- Record the original heating cable resistance and insulation resistance.
- Compare test values with the product specification and local electrical requirements.
- Do not energize a visibly damaged cable.
A complete troubleshooting record should include supply voltage, operating current, heating cable resistance, insulation resistance, thermostat input voltage, thermostat output voltage, floor sensor resistance and installed heating power per square meter.
Fault 1: The RCD Keeps Tripping
An RCD, RCCB or RCBO disconnects the circuit when leakage current flows to earth. If it trips when the electric floor heating system is switched on, the most likely cause is reduced insulation resistance between the heating conductor and the earth screen.
- Damage to the heating cable outer sheath.
- A screw or nail penetrating the cable.
- Damage during screed or tile installation.
- Moisture entering a cable joint.
- A damaged cold lead connection.
- Incorrect wiring or a defective leakage protection device.
How to Test Insulation Resistance
Disconnect the heating cable from the thermostat and test between the heating conductor and earth using a megohmmeter. A common test voltage is 500 V, and some systems use 50 Mohm or higher as a normal reference value. The exact acceptance value must follow the heating cable manufacturer specification and local electrical requirements.
A normal multimeter should not be used for this test because insulation resistance is usually much higher than the range accurately measured by an ordinary meter.
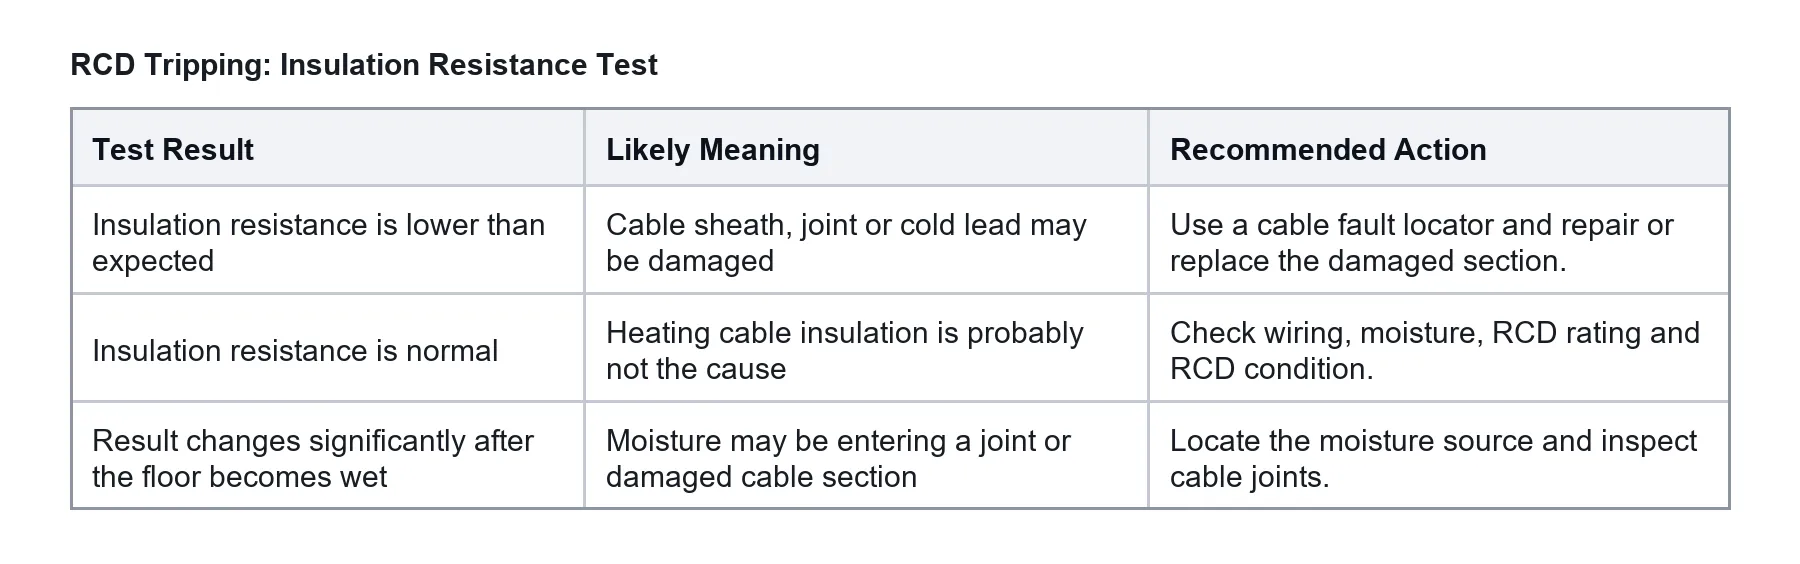
The RCD should only be considered defective after the heating cable and circuit wiring pass the required insulation tests.
Fault 2: The Circuit Breaker Keeps Tripping
A circuit breaker normally trips because of overcurrent, overload or short circuit.
- Supply voltage outside the permitted range.
- Connected heating load exceeding the breaker rating.
- Incorrect breaker selection.
- Short circuit inside the heating cable.
- A nail or screw penetrating both conductors.
- Incorrect wiring, loose terminals or overheated terminals.
- A defective breaker.
Measure the Supply Voltage
Use a multimeter set to the correct AC voltage range. For a nominal 220-230 V system, the voltage should remain within the permitted product range. A common reference range is AC 220 V /-10%. If the voltage is abnormally high, stop testing and inspect the building power supply.
Measure the Operating Current
Use a clamp meter on a suitable current range. The expected current can be calculated as:
Expected current (A) = Power (W) / Voltage (V)
For example, a 2,000 W heating system operating at 230 V should draw approximately 8.7 A. The measured current should be reasonably close to the calculated value.
If the current is much higher than expected, disconnect the power and measure the heating cable resistance. The expected resistance can be calculated as:
Expected resistance (ohm) = Voltage squared (V2) / Power (W)
If the measured resistance is much lower than the design or factory value, the cable may have an internal short circuit. A cable fault locator can then be used to identify the damaged area.
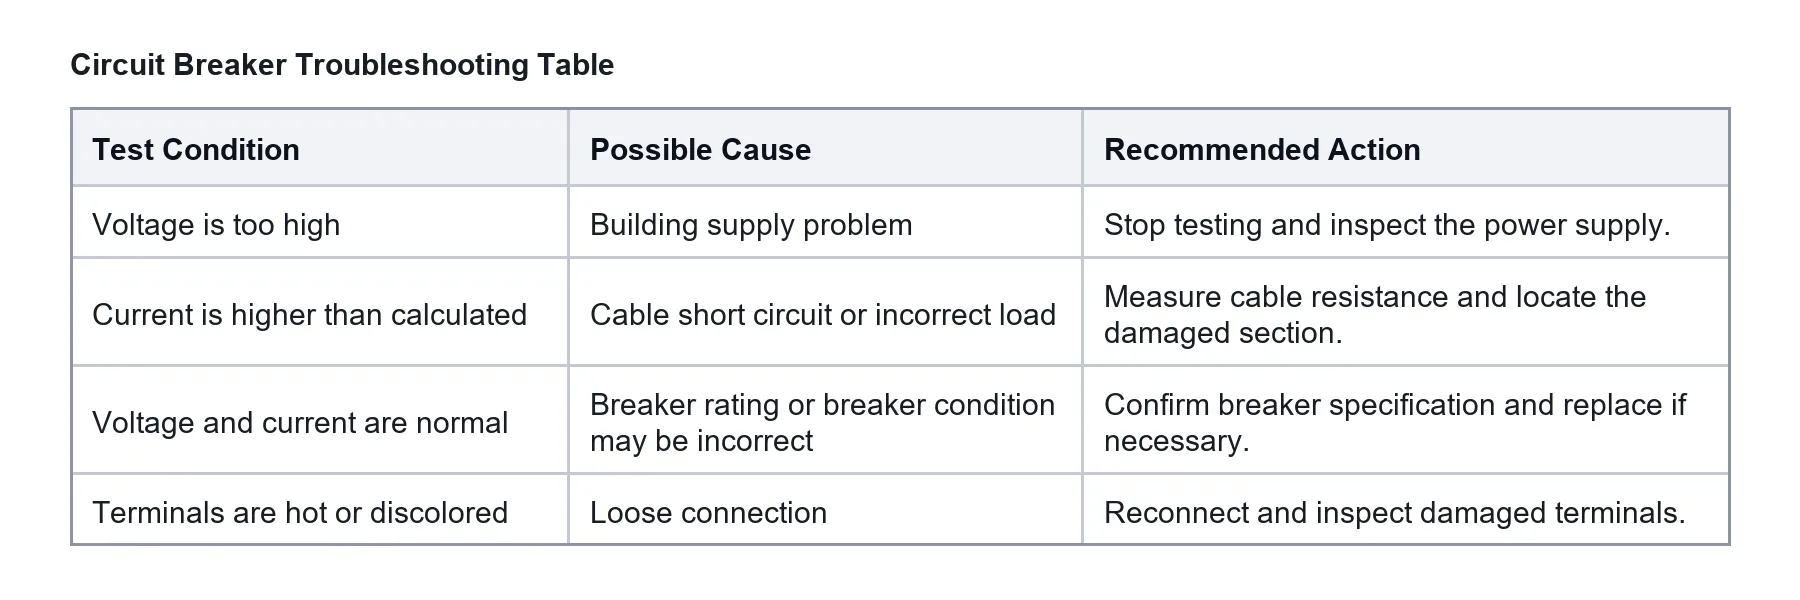
Do not simply replace the breaker with a higher-rated model without checking the conductor size, heating load and protection requirements.
Fault 3: The Floor Heats but Does Not Reach the Required Temperature
A system may draw current and produce heat, but the room or floor still fails to reach the required temperature. This does not always mean that the heating cable is defective.
- Low supply voltage or insufficient installed heating power.
- Poor insulation below the heating cable.
- High heat loss through walls, windows or floor structure.
- Wet insulation or excessive screed thickness.
- Incorrect thermostat settings or incorrect floor sensor position.
- Heating cable sinking into insulation.
- Floor covering with high thermal resistance.
Check Voltage, Current and Actual Power
Measure the supply voltage while the system is operating. Then measure the current and calculate the actual heating power:
Actual heating power (W) = Voltage (V) x Current (A)
Compare the result with the designed heating load. If the system was designed for 150 W/m2 but the measured output is much lower, the floor may heat slowly or fail to reach the target temperature.
Check the Heating Mat Design
Insufficient heating performance may result from a heating mat area that is too small, excessive unheated floor area, incorrect cable spacing, high room heat loss, poor building insulation, or using comfort heating as the only heat source.
MENRED electric heating mats are commonly used for bathroom floor heating, tile floor heating, renovation projects, supplementary comfort heating and small-area heating. The MENRED Electric Underfloor Heating Mat can be combined with a suitable floor heating thermostat and sensor, but the installed wattage must still match the room heat-loss calculation.
Use a Thermal Imaging Camera
If voltage, current and total power are normal, inspect the floor with a thermal imaging camera. Thermal imaging can reveal uneven heating areas, cable displacement, incorrect cable spacing, cable sections installed too deeply, local cold areas, local overheating and heat loss patterns.
Check the Floor Construction
Electrical values may be normal while floor performance remains poor. Construction-related causes include water inside the insulation layer, insufficient insulation thickness, gaps between insulation boards, poor wall or window insulation, screed that is too thick, incorrect cement and sand ratio, or floor covering with excessive thermal resistance.
Project note: For bathroom, renovation or tile floor heating projects, contact MENRED for heating mat model selection, thermostat matching and project quotation support.
Fault 4: The Floor Remains Completely Cold
A completely cold floor normally means that the heating circuit is not receiving power or that no current is flowing through the heating element. The system should be checked in a fixed sequence.
Step 1: Check the Thermostat Input Voltage
Measure the voltage at the thermostat supply terminals. If no voltage is present, check the main power supply, circuit breaker, RCD, neutral conductor, cable connections, junction box and upstream isolator. Do not replace the thermostat before confirming that it receives the correct input voltage.
Step 2: Check the Thermostat Output Voltage
Set the thermostat above the current room temperature so that it calls for heating. Measure the output voltage. If the thermostat has input voltage but no output voltage, possible causes include incorrect settings, incorrect wiring, damaged thermostat relay, floor sensor fault, temperature limit protection or thermostat failure. The floor sensor resistance should also be checked and compared with the thermostat manual.
Step 3: Measure the Heating Circuit Current
If the thermostat output voltage is normal, use a clamp meter to check whether current is flowing. If there is voltage but no current, disconnect the power and measure the heating cable resistance.
No Resistance or Open Circuit
If the meter shows an open circuit, possible causes include a broken heating cable, damaged cold lead, failed cable joint or loose terminal connection. A cable fault locator can help identify the failure point.
Resistance Is Normal but No Heating
If cable resistance is normal, check the underground thermal limiter, safety cut-out, cable joint, terminal connection, thermostat switching function and floor sensor protection settings.
Current Is Normal but the Floor Is Cold
If voltage, current and resistance are all normal, the problem is probably related to installation or heat transfer. Possible causes include cable installed too deep, cable sinking into insulation, excessive screed thickness, insulation installed above the heating cable, incorrect floor covering or significant downward heat loss. A thermal imaging camera is particularly useful in this situation.
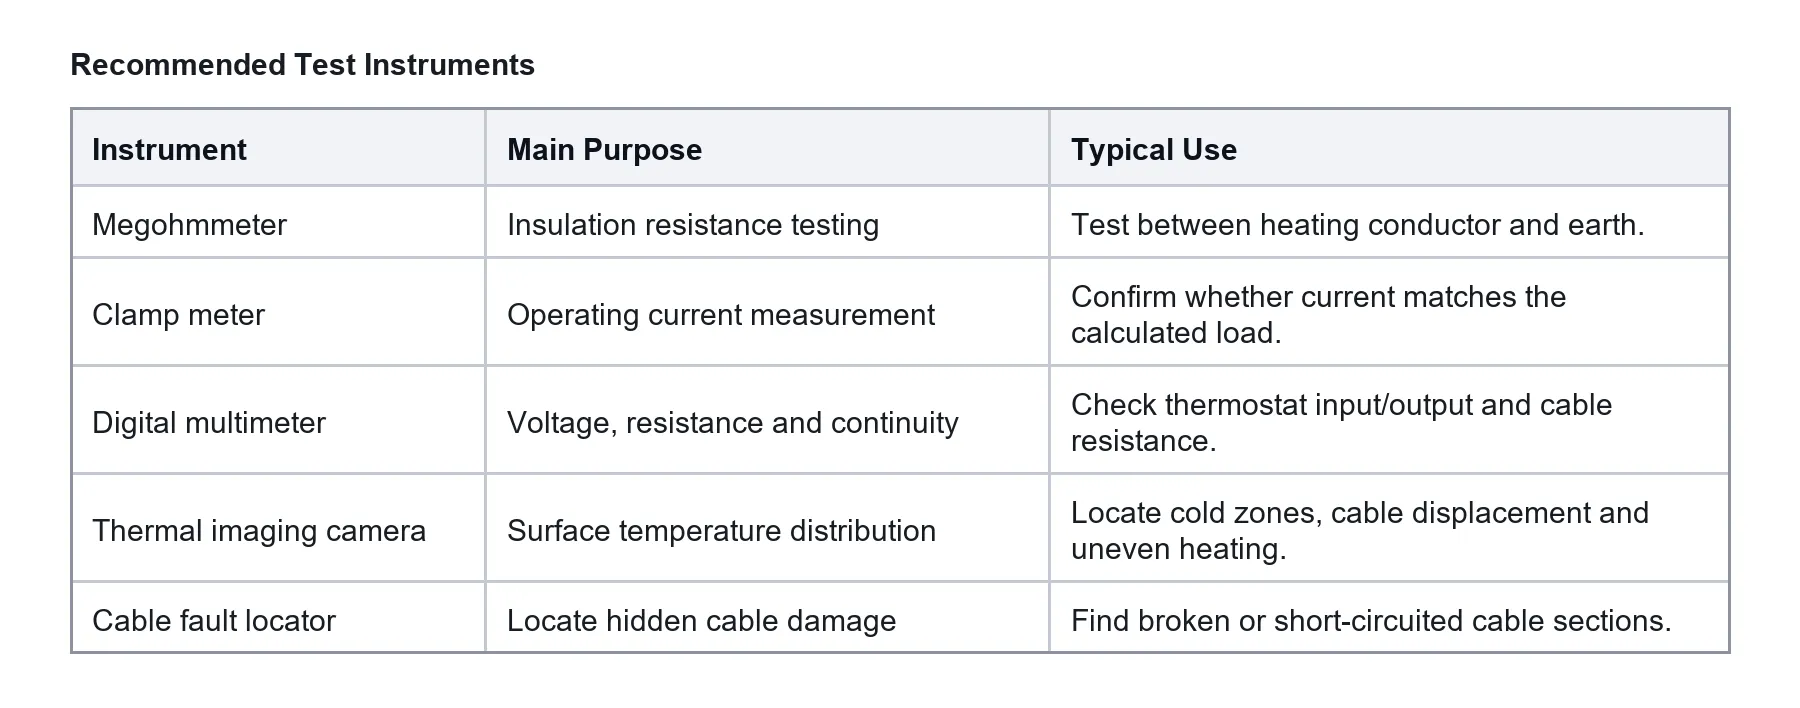
Heating cable resistance is commonly in the tens of ohms, while some smaller-power circuits may exceed 200 ohms and require a higher resistance range. Always compare measured values with the product specification.
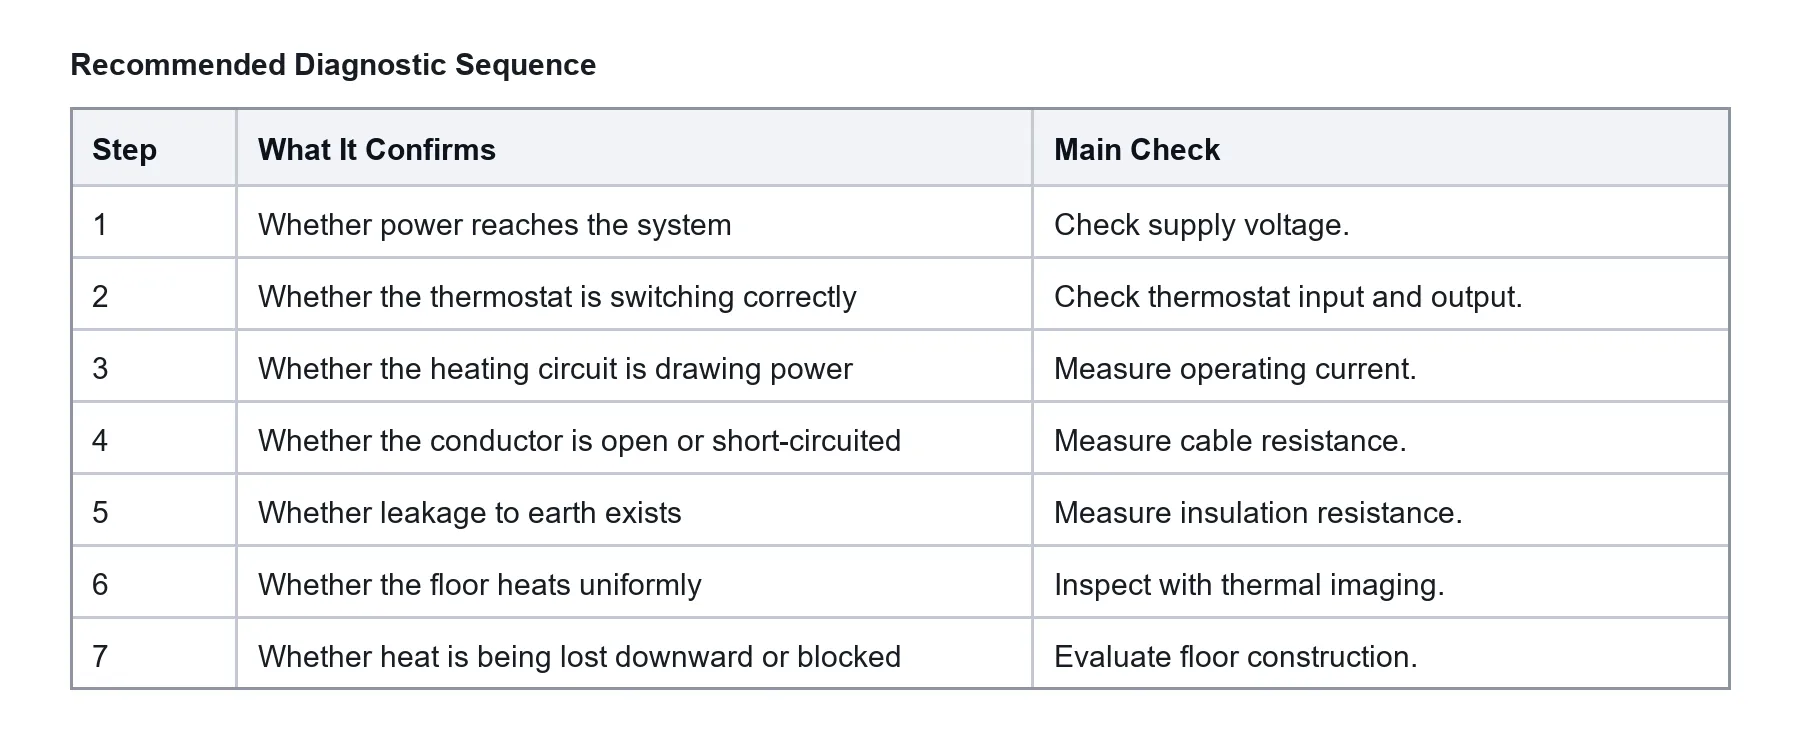
Following this sequence helps avoid replacing a thermostat, breaker or heating cable without confirming the actual fault.
How to Prevent Electric Floor Heating Failures
Many faults can be prevented during installation. Recommended checks include:
- Measure cable resistance before installation.
- Measure insulation resistance before installation.
- Repeat both tests after the cable is fixed.
- Repeat both tests after screed or tile installation.
- Record all test results and photograph the cable layout.
- Avoid crossing or overlapping cables.
- Keep cables away from drilling zones and protect cable joints.
- Confirm thermostat load capacity and install the floor sensor inside a conduit.
- Confirm insulation thickness and heating power before installation.
Installers should provide a heating layout drawing, cable resistance record, insulation resistance record, thermostat model, circuit breaker information, installation photos and warranty documentation. These records can significantly reduce troubleshooting time.
FAQ: Electric Underfloor Heating Troubleshooting
Why does my electric underfloor heating trip the RCD?
The most common reason is reduced insulation resistance caused by cable sheath damage, moisture, a damaged joint or incorrect wiring. Test insulation resistance before replacing the RCD.
How do I test an underfloor heating cable?
Disconnect the power, measure conductor resistance with a suitable meter, and measure insulation resistance with a megohmmeter. Compare all values with the manufacturer specification.
Why is my floor warm but not hot enough?
Possible causes include low voltage, insufficient installed wattage, poor insulation, excessive screed thickness, incorrect sensor position or high heat loss from the room.
Can a thermostat cause underfloor heating to stop working?
Yes. A thermostat can fail to switch output voltage because of incorrect settings, wiring problems, a relay fault, floor sensor fault or temperature limit protection.
Can damaged heating cable be repaired?
In many cases, a trained installer can locate the damaged section with a cable fault locator and repair it using an approved repair kit. The repair must be tested before the floor is put back into service.
Final Recommendation
Electric underfloor heating faults should be diagnosed using electrical measurements and installation information together. Voltage, current, conductor resistance and insulation resistance reveal the electrical condition of the system. Thermal imaging and floor construction analysis reveal whether the generated heat is reaching the floor surface effectively.
For most troubleshooting cases, use this order: confirm the power supply, check thermostat input and output, measure operating current, measure heating cable resistance, test insulation resistance, inspect the floor with a thermal camera, and check insulation and floor construction. Replacing components without completing these tests can waste time and leave the real problem unresolved.
Need an Electric Underfloor Heating Solution?
MENRED supplies electric heating mats, floor heating thermostats, floor sensors and selected OEM solutions for bathroom, renovation and tile floor heating projects.
Get a Free Quote